Sunday, March 10, 2013

Delicious Pairings - Some Things are Better Together

Have you ever noticed that some things are better in pairs than alone? The two things combine into something new and when it's a good pair, they bring out the best in each other. Peanut butter and jelly. Road trips and good music. Hot chocolate and a snowy day. Coffee and a chocolate brownie.


Last week, I was excited to get the chance to go to Walmart and check out the new "Delicious Pairings" section, featuring Starbucks coffee and Walmart's bakery. I loved the display, and all of the helpful suggestions for finding the right coffee and pairing it with the best baked treat. I was impressed with the amazing selection of the Walmart bakery, from brownie bites, to marble cake, to mini muffins. #deliciouspairings


I really enjoy coffee, and the taste and quality matters a lot to me, however so does the price. That's why I rarely ever get coffee out, and just brew quality coffee at home. My husband used to be a barista and is pretty picky about what coffee he gets. We do enjoy trying different coffees and flavors from time to time, especially seasonal ones, but our go-to favorite coffee is Starbucks Blonde Veranda Blend.


I like coffee by itself, but sometimes it can be just a little bitter, and it leaves you wanting something more. I got some of the Atlanta Bread Brownie Bites at Walmart as well as some Starbucks Blonde Veranda Coffee (although we already had some at home), and hurried home to try them together. It was difficult waiting for the coffee to brew to break into the brownies, haha.


The brownies were really delicious and went together so well with the coffee. Both the brownies and the coffee complimented each other so well. When I took a bite of the one, I wanted a sip of the other, and vice-versa.


When I think of coffee and brownies, I automatically think of my Grandmother. In honor of International Women's Day, I wanted to do something special to honor her. We have always been very close, and she has always been a huge inspiration to me. Unfortunately, her memory has been failing her lately. She still remembers who we all are, but doesn't remember most things that happen from day to day, what year it is, or even a lot of things about her own life and personality. It's interesting, there are several things that she has always loved, and it seems that as her memory fades more and more her love of these things grows stronger and more resolved: coffee, chocolate, bridge, Gone with the Wind, her family. I know that when I bring her a cup of coffee, a brownie, and the bridge hand from the morning paper, her face will light up and it will literally make her day. I think it's both the delicious taste of coffee and desserts, as well as the lifetime of memories associated with them, even those memories she can't quite recall, that makes my Grandmother get so much joy from something as simple as a little plate holding a cup of coffee and a brownie. I think I enjoy taking them to her and sharing in this little ritual with her as much as she does.


*I am a member of the Collective Bias® Social Fabric® Community.This shop has been compensated as part of a social shopper insights study for Collective Bias™. All opinions are my own. #cbias #SocialFabric

Runway Inspired Lace Tip Nails


There are so many fun trends in fashion this spring, from bold shapes and patterns, to black and white, to lace. When I was given the opportunity to create a runway inspired nail tutorial with Sally Hansen nail products for the spring, I knew I would have trouble choosing just one. When I went to Walgreens to look at the collection, my decision got even more difficult. There were so many gorgeous colors and styles of polish that were beautifully displayed. You can see my Google+ shopping album here.


I love the pink and gold metallic nails in this Walgreens display! There was also a beautiful section of Sally Hansen nail polish called "Colors of the Season" with a great selection of trendy colors. #ILuvNailArt

(P.S. There is a BOGO 50% on Insta Dri and Salon Effects at Walgreens that runs until 3/30/13. If you buy 2 between 3/10-3/16, then you will receive 2,000 rewards points.)

After a LOT of deliberation (and a few weird looks from other customers), I finally narrowed it down to just a few products with a design in mind. I made sure to use my Balance Rewards card for extra points and discounts. I ended out choosing one of my favorite trends right now, black lace, which is both classic and current.

(SourceSource


Here is a trendy spring outfit I put together that would look great with these black lace tip nails. It features two of the Pantone spring 2013 fashion color report, poppy red and linen.


1. Salvatore Ferragamo Lava Juliette Tote  2. Valentino Couture Lace D'Orsay  3. Freshwater Pearl Earrings  4. Romantic Luxe Twill Skinny Jeans  5. Lipsy Tunic Top  6. Allure's Top 8 Spring Make-up Trends  7. ASOS Nude Round Sunglasses  8. Pearl and Bead Bracelets  9. River Island Black Leather LOVE Bracelet  10. Black Lace Tip Nails (Sally Hansen Nail Effects)


HOW TO CREATE THIS LOOK

What I used:
1. Sally Hansen Xtreme Wear "White On"
2. Sally Hansen Insta-Dri "In a Flash"
3. Sally Hansen Mega Shine Top Coat
5. (Optional) Sally Hansen No More Mistakes Manicure Clean-up Pen


What you do:
1. Paint your nails with 1-2 coats of white paint. A lot of light and neutral colors are pretty transparent and the white base gives your nails an even and brighter look. For a more see through look, you can skip this step.
*Make sure to let each coat fully dry before applying the next one. 
2. Paint on a coat of your colored nail polish. I used the Insta-Dri polish (which dried quickly, hooray!) in the color called "In a Flash". A darker nude shade would also work well.
3. Touch up any nail polish spots or edges with the Sally Hansen No More Mistakes Manicure Clean-up Pen. This pen was amazing and SO easy to use. It really allowed me to paint right up to the edges to my nails with a straight line.
4. Prepare your nail polish strips. Choose strips that are the right width for each nail, and cut them to cover the top halves of your nails. Make sure they fully cover past the top of your nails. (These fun strips are made of real nail polish so they don't look or feel like stickers. They come right off with nail polish remover.)
5. Follow the instructions for the strips. Basically, peel off the front and backs from the strips, press them against your nails (you can stretch them a little bit if you need to), then use the provided nail file to file the ends. Be careful to not file off too much of the strip.
6. Make sure you are happy with how everything looks and that everything is smooth and even.
7. Add a coat of Mega Shine Top Coat, making sure it covers the front end of your nails. I LOVE this top coat, plus it extends the life of your manicure and prevents chipping.
8. Let it dry and enjoy!


You can keep up with Sally Hansen on twitter or check out the I Heart Nail Art app where you can submit your own nail art for a chance to win $500, a trip to NYC, and a $2000 grand prize. (Check out the app for more details.)

 I am a member of the Collective Bias®  Social Fabric® Community.  This shop has been compensated as part of a social shopper insights study for Collective Bias®  and COTY. All opinions are my own. #cbias #SocialFabric

Friday, March 8, 2013

How to Print Photos from Your Phone or Facebook with the Walgreens Mobile App

Hi, my name is Rachel, and I'm a photo addict. I take pictures... lots of pictures... all the time. I've always loved taking pictures, but especially since my kids were born and I started blogging, I've found myself taking thousands of pictures a year. Since I don't always want to carry my big camera around with me, I capture a lot of great shots of the kids with my phone. Honestly, many of my favorite pictures were taken with my phone because I was able to capture a spontaneous moment. (And these are the cute pictures that are perfect for crafts and gifts, like these Easter Photo Gift Tags. Scroll down for the free printable.)


The crazy thing is, I rarely print pictures. In fact, it's ridiculous how few printed pictures I have of my kids. I've always just put it off, thinking I'd have to take forever to move the pictures from folders on my computer or files on my phone to a disk and then take them in to get printed. Now that has changed. It is SO easy to use the Walgreens Photo App. Now I am hooked, not just on taking pictures, but on printing them. In about 5 minutes, you can open the Walgreens app, choose pictures from your phone or Facebook to print, and order them. This is especially useful for printing some pictures to send in a holiday card, or in putting together a quick gift for a family member, like these meaningful Easter gifts I put together for my parents and my in-laws.


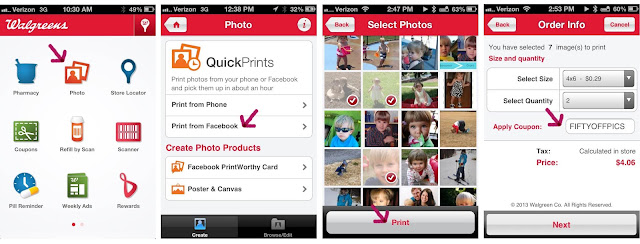
How to use the Walgreens Photo App: 
1. Download and open the free Walgreens app. Click on Photo.
2. Now you can choose if you want to print pictures from your phone or from Facebook. (I don't think you can print pictures from both your phone and Facebook in the same order, but it is so easy to just place a second order.)
3. Click on the photos you want to print. A check mark will appear. You can only upload 5 photos at once. Click print to add them to your cart, but you can keep adding more pictures before checking out.
4. Choose what size and quantity of photos you want. Don't forget to search for coupon codes. I found one for 50% off prints.


5. You will be asked to choose a location. You can type in a zip code, but the closest Walgreens locations to me were already listed.
6. Enter your info and submit your order. You don't have to enter credit card info or anything. You can pay in the store.
7. Don't forget to use your Balance Rewards Card. It's easy to sign up, and if you already have a card, you can just scan it.
8. That's it. Now you pick up your pictures. The estimated time is usually an hour, but my first order took only about 15 minutes. 


(You can see my whole shopping experience here.) While you're there, check out the awesome photo center. Walgreens also carries a small but cute and affordable selection of picture frames. Right now, they are buy one get one free. I love how these simple black frames look, and I ended up paying $7 total for them. #HappyHealthy

As much as I LOVE this app and definitely plan on using it again and again, I have one quick caveat for you to keep in mind when printing pictures from Instagram. I ended out printing pictures from Facebook, my camera roll, and a few that I had cropped and edited on Instagram. Because these Instagram pictures are square, I thought that they would print 4 x 4 with 2 inches of white space to the side (which is exactly what I wanted). However, they automatically zoomed in to fill the 4 x 6 space. About half of the pictures were messed up completely, but the other half turned out great. In fact, the adorable picture of Lyla pretending to drive the car (in the second frame at the bottom of the post) was one of these zoomed in Instagram photos and I love how it turned out. I would just recommend printing the original version from your camera roll in most cases.


You can also print pictures of your phone to make personalized gift tags. You can print these Happy Easter tags for free HERE. I printed them onto kraft paper cardstock, but they also look cute on white cardstock. You need a circle paper punch that is 1.5" in diameter.


Print out the gift tags onto cardstock. Cut them out just inside of the light gray lines. Use a 1.5" circle hole punch to cut out a circle in the egg for your photo. Put the tag over your Walgreens prints and find pictures that fit well in the circle. Trim the picture so that it's smaller than the tag and larger than the circle, and tape it to the back of the tag (of course I used colorful washi tape). Punch a hole in the top and add some ribbon, then use these cute personalized tags to give gifts this Easter.

VIEW AND PRINT THE PHOTO GIFT TAGS


I ended out making two different versions, one for each set of grandparents.


You can view and print the photo Happy Easter gift tags HERE.

You can follow along with Walgreens on Facebook or Twitter.

“I am a member of the Collective Bias®  Social Fabric® Community.  This content has been compensated as part of a social shopper insights study for Collective Bias® and Walgreens. All opinions are my own. #cbias #SocialFabric

Thursday, February 28, 2013

DIY Sparkling Metallic Wedding Initials


The next few days are part of a wedding themed weekend at Lines Across. Today I'll be sharing the tutorial for this project I made with the David Tutera Bridal Collection. Tomorrow, I'll be sharing some DIY wedding ideas and inspiration. Then on Saturday, I'll share some pictures with you from my wedding and include a linky where you all can share posts you've done talking about your weddings. Who doesn't love looking through other people's wedding photos?

david tutera, bridal

I was very excited to get the opportunity to try out some of the products from the David Tutera DIY Bridal Collection. My good friend Kristin (who I sadly rarely get to see) is getting married this summer, and I wanted to make some initials for her wedding. Right now, she is planning on displaying these letters at the soft serve frozen yogurt table (genius!). 


How to Make Glittery Silver Initials

What you need:
1. Paper mache letters
2. Acrylic paint (white and silver)
3. Paint brush
4. Self-Stick Shimmer Sheet Rhinestones (From the David Tutera Bridal Collection)
5. Decoupage or glue
6. Very fine silver glitter


What you do:

1. Paint the letters with white acrylic paint. Use a very thin layer of paint and brush in different directions to create texture.

2. Once the white has dried, paint a thin coat of silver paint (I used Martha Stewart "Sterling Silver"). Keep adding thin coats of paint until you are happy with the look. 

3. Apply a thick and even layer of decoupage around the edges of your letters. You have to do this step in sections.

4. Pour lots of glitter over the wet edges. Make sure that each side has fully dried before turning over the letters to do the other side.

5. Cut the self-stick shimmer sheet rhinestones into rows. The rhinestones and shimmery border peel away from the backing, and are applied like a sticker.

6. Start at one corner and stick the rows of rhinestones along the borders of your letters. I found that they stuck very well, even to the painted surface. It was also easy for the rows to turn and bend naturally around the curved parts of the letter D.

7. To keep the glitter from shedding, dab thin layer of watered down decoupage over all glittery areas. Make sure that this coat is very thin and even.


How to Make the Silver Heart

Now that you have your letters, you can use them by themselves, or connect them together with a heart. I painted the wooden heart (I found it at Michael's) in the same way as the letters. I then added decoupage and glitter to the inner heart, along with a thin top coat of watered down decoupage. I then added a row of Self-Stick Teardrop Rhinestones from the David Tutera Bridal Collection around the outside of the heart. They were very easy to use and feel very secure. 


How to Attach the Letters and Heart

I was planning on using a hot glue gun to attach the three pieces together. However, I found that it did not stick well at all to either the cardboard or the glitter, and since I am going to be packing this up and mailing it for my friend to use at her wedding, I wanted to make sure it was very secure, and that nothing would fall off on the big day.

1. Use a straight surface (like a level or ruler) to line up your letters and heart just as you want them. Add a dab of hot glue in between the edges of the heart and the letters. This will not hold well, but should keep everything in place.


2. Flip your letters and heart upside down, and line them up with the straight edge again. Put something (like a book) under the heart so that the back is even with the backs of the letters.


3. I used screws and a thin piece of wood to attach the letters. You could also use glue, or even mount the letters to a base. I would not recommend using nails, because the hammering would put too much pressure on the cardboard letters. 


4. Paint over the back with a few thin coats of silver paint.


These letters would look great displayed next to pictures of the bride and groom. I love these geometric table number stands from the David Tutera Collection that also make great picture holders.


I'm not always a huge fan of glitter, sparkles, and bling, but I love the right kind of tasteful shimmer, especially at a wedding. These letters do have a LOT of bling :)


These joined initials also make a beautiful wedding keepsake that you can display somewhere in your house to remember the big day. I think this would also make an amazing wedding photo prop. The bride and groom could hold the the side with their letter.

Keep up with the David Tutera Bridal Collection by connecting with Darice Crafts:
Become a fan of Darice on Facebook
Follow @DavidTutera on Twitter
@Darice_Crafts on Twitter
David Tutera DIY Wedding on Pinterest

Be sure to check out these other projects made with the David Tutera Bridal Collection:

Thursday, January 10, 2013

Hosting a Party for the Big Game with World Market

We love football, and especially love having friends over to watch the Big Game. This week, I got the chance to shop at World Market for supplies we will need to host a fun football party. I LOVE LOVE LOVE World Market, because not only can you find great furniture, serving ware, place settings, and centerpieces there, but you can also find a fantastic selection of food and drinks, many of which are not available at most grocery stores.


I wanted to set up a buffet table in the back yard with snacks, drinks, and napkins. I got this gorgeous Laurel  table runner and two sets of buffet napkins: Ocean Blue, and Golden Yellow. These colors are the theme for the overall table.


I also purchased some beautiful margarita glasses and pitcher with gorgeous cobalt blue handles and rims. World Market carries a lot of great drink mixes, and I went ahead and bought some organic margarita mix. I'm so excited to serve it in my new glasses.

I found three ceramic mixing bowls in green, blue, and yellow that are perfect for serving chips.


And this little guy? Too cute! I think this little elephant serving bowl might be my favorite World Market find of all. A perfect way to serve these fun football shaped pretzels.


Here are all of the food items I found at World Market:

1. Utz Football Shaped Pretzels

2. Frontera Tortilla Chips

3. Frontera Blue Corn Tortilla Chips

4. Tres Agaves Organic Margarita Mix

5. World Market Sparkling Mineral Water

6. Frontera Salsa (So delicious!): Jalapeno Cilantro and Mango Key Lime

7. Arizona Gunslinger Hot Sauce Sampler Pack (My husband is especially excited about this)


I am really obsessed with serving things in individual containers. My sister-in-law, Jill, made something similar to this at her daughter's amazing Mississippi River themed first birthday party. I found these small square glass containers at World Market that were perfect for this individual layered chip dip. Plus, I love how you can see all of the layers along the side.

Individual Layered Chip Dip

Ingredients:

1. Ground Beef
2. World Market Taco Seasoning (Ridiculously delicious! So much better than the packaged taco seasoning from the grocery store.)
3. Sour Cream
4. Diced Tomatoes
5. Shredded Cheese
6. Frontera Jalapeno Cilantro Salsa (from World Market)
7. Diced Green Onions


Directions:

1. Brown 1 pound of ground beef. Follow the instructions on the World Market Taco Seasoning (Add 1/4 cup seasoning and 3/4 cup water).

2. Add a layer of Frontera salsa.

3. Add a layer of sour cream, and spread it out evenly.

4. Add a layer of diced tomatoes.

5. Add a layer of shredded cheese.

6. Add a layer of diced green onions.

(Optional: You could add other layers such as queso, refried beans, or guacamole)


These little glass containers are great! They are such a good value and are great for so many fun individual sized treats.

Do you love World Market like I do? Follow along on Facebook, Pinterest, and Twitter.

Also, enter the World Market Sweepstakes below:

This shop is part of a social shopper marketing insight campaign with Pollinate Media Group™, but all my opinions are my own. http://cmp.ly/3/8vNxcO

Monday, January 7, 2013

Ready for Some Football with Rubbermaid

We love football at my house. Go Cowboys! One of my favorite parts about football is how it brings friends and family together, whether at a fun tailgating party, through "did you see that play?!" phone calls to your dad during a big game, or through a Sunday afternoon curled up on the sofa with your family cheering for your favorite team.


It's great to be prepared for any parties you might be attending (or hosting) this football season. One of our favorite snacks to take with us (or serve) is chips and dip. In the past, I've brought a bag of tortilla chips and a jar of salsa to a friend's house, only to have them have to find bowls for them. Other times, I've brought nice dishes covered in plastic wrap, spilled salsa in my car, and left my favorite dishes behind. Now, I've found Rubbermaid Take-Alongs and Easy Find Lids, and I have a new go-to way to take snacks.

What's GREAT, is that Target is offering coupons for these Rubbermaid products. (You can print the coupons HERE).


Here's what I did: I used one of the large Take-Along Rubbermaid containers for the chips. One bag of tortilla chips fit perfectly in this container. These containers also are a great value, so you won't have to worry about accidentally leaving one behind. They also have a no-leak seal so that you can transport all kinds of things without worrying about spills in your car.


Then, I used some of the smaller Easy Find Lid Rubbermaid containers for salsa and guacamole. I especially love these Easy Find Lid containers. The lids snap onto the bottom of the containers, so that you won't loose them. You can even stack all of the lids together. I used some of the smallest of these containers to take extra sides to go with the chips and dip: shredded cheese, diced tomatoes, jalapeƱos, and fresh cilantro. These are great for on the go, or for storing food at home. We don't have a lot of storage in our kitchen, so I especially appreciate how easily they stack together and store neatly.


Don't forget to print these great Rubbermaid coupons at Target's website. There is one coupon for the Easy Find Lids containers and one for the Take-Alongs.

Rubbermaid is hosting a Game Day Party Sweepstakes.  They are offering the chance to win an Easy Find Lids Party Pack, a 48Qt Cooler and $100 VISA gift card! Awesome!

Enter to win HERE. (Entries are limited to one entry per person / per email address / per day. Sweepstakes starts December 19, 2012 and ends January 21, 2013.)

Connect with Rubbermaid: Twitter, Facebook, Pinterest

What about YOU? What is your favorite snack to bring to a party? Which of these containers would you want to try out?

“This shop is part of a social shopper marketing insight campaign with Pollinate Media Group™, but all my opinions are my own. http://cmp.ly/3/8vNxcO

LinkWithin

Popular Posts